The Best Dark Chocolate Butter Cup You’ve Ever Had!

If you haven’t noticed by now, but I have a serious sweet tooth and it usually involves dark chocolate! Just like I think about the rest of my food – I like to make sure my sweets are nutrient dense + made from the best ingredients, which is why I usually opt to make healthier versions at home rather than relying on store bought “healthy” products. One of my all time favorite desserts because it’s easy + fast is the dark chocolate butter cup. The reason I say “butter” is because you can use all types of filling in your butter cups, including but not limited to:

My personal favorites as of late are tahini + coconut butter, but they are all AMAZING! You can also add additional ingredients like shredded coconut, sea salt, or chia seeds to top them off for even more nutrients. However, you do need some simple molds to make this easy on yourself:

Mold Options:

  1. If You Care Mini Baking Cups
    • These are perfect for mini butter cups if you don’t want to invest in molds. Plus, you can always use them for presentation purposes for chocolate truffles or energy balls as well as baking mini cupcakes!
  2. If You Care Large Baking Cups
    • If you want those original size Reese’s butter cups, then you would want to go with these large baking cups. Note: You will only need to fill 1/3 of the cupcake mold or you will have a really massive butter cup!
  3. Freshware Chocolate Molds
    • These molds are inexpensive + make it super easy to keep the butter cups level in the freezer!

Now for the recipe…


The Best Dark Chocolate Butter Cup You've Ever Had!
 
Prep time
Cook time
Total time
 
Serves: 12-14 mini cups or 6-7 large cups
Ingredients
  • 1 cup vegan dark chocolate chips or 1 dark chocolate bar
  • 1 tbsp coconut oil
  • 7-10 tsp nut/seed/coconut butter (Don't need to measure out as you can scoop out of the jar but just make sure you have enough left!)
  • Optional Toppings: Unsweetened shredded coconut, chia seeds, sea salt, etc.
Instructions
  1. In a microwave safe measuring cup or bowl, add chocolate + coconut oil and put in the microwave for 2 minutes. Make sure to stop the microwave every 40 seconds to stir and make sure chocolate doesn't burn. (Note: If you are doing a double batch, only heat 1 cup of chocolate at a time as I have noticed it tends to burn with more than that.)
  2. Pour ⅓ of the chocolate molds with melted chocolate.
  3. Add ½ tsp of butter for mini cups or 1-1½ tsp of butter for large cups. I like to push down the butter slightly to make sure some of it is submerged.
  4. Fill the remainder of the mold with melted chocolate but making sure not to overfill the mold! Top off with toppings or leave plain.
  5. Place in the freezer on a level surface or plate and freeze cups for at least 20-30 minutes. Serve immediately after taking out of the freezer as the coconut oil makes the dark chocolate melt more quickly. Keeps in the freezer for up to a month or so but most likely won't last that long b/c they're so delicious!


I wish you happy + healthy eating with these butter cups! If you want to learn more about my programs + how I teach clients to think about food as a way to fuel, nourish + heal the body rather than satisfying a craving – click here for a complimentary health consultation!

With Health + Happiness Always,
Jax

Coconut Truffles

Happy MDW – I couldn’t be more happy that summer is finally here! I’m also so grateful for the beautiful weather we had here in NY this past weekend. Since summer is upon us and I haven’t posted a truffle recipe this month, here ya go: COCONUT TRUFFLES. Coconut reminds me of beaches, which reminds me of summer so that’s why I decided to kick off summer with this healthy dessert. I’m a big fan of all things dark chocolate + coconut. These taste like a little bit of heaven in your mouth and are a much healthier version of a Mounds candy bar. These chocolate truffles are perfect to bring as a guest for any summer BBQ or social gathering – I know my fam LOVES them. Hoping everyone soaks up all the vitamin D they can this weekend 🙂

Coconut Truffles
 
Prep time
Cook time
Total time
 
Serves: 22
Instructions
  1. Place dates, coconut milk, coconut butter, vanilla extract + coconut flour into a high speed blender or food processor.
  2. Blend for 30 seconds to a minute until well combined and a dough forms. If it's too thick, feel free to add an extra splash of non-dairy milk to get it going.
  3. Place the dough in a bowl. If it's on the warm side, cover the bowl and place in the fridge for 10-15 minutes.
  4. Place the dark chocolate + coconut oil into a glass bowl in the microwave and melt for 45 seconds to 1 minute + 30 seconds. Make sure to stop periodically to stir so it doesn't burn!
  5. Place parchment paper on a baking tray.
  6. Roll the dough into slightly smaller golf ball size balls + coat in melted chocolate and place on parchment paper. Sprinkle with shredded coconut flakes!
  7. Place in the fridge for 30 minutes to harden and enjoy!
  8. Lasts in the fridge for 2 weeks or freeze for 1 month (I promise they won't last that long though!)
  9. *Note: You can use any non-dairy milk on hand if you don't have coconut milk.


With Health + Happiness Always,

Jax

PS – Want to live your best life this summer, but need some help on finding the balance? Click here to sign up for a complimentary health consultation today!


Spring Lavender Truffles

Spring has sprung! In light of everyone loving the monthly truffle recipes, I decided to do a floral version this month for spring + the holidays. Lavender is one of my favorite essential oils given how versatile it is between diffusing it, applying it topically, and adding it to food. I diffuse it before bed for relaxation + a peaceful slumber. Topically, I use it as an anti-bacterial solution for acne. Lastly, adding it to this truffle provides both of those benefits plus a floral hint to the chocolate. (Note: Only use high grade oils to add to your food like doTerra.) If you still need a healthy dessert recipe for the holidays, these taste as good as they look!

Spring Lavender Truffles
 
Prep time
Cook time
Total time
 
Serves: 20
Ingredients
Instructions
  1. Place dates, coconut milk, coconut butter, lavender oil, vanilla extract, coconut flour + 1 tbsp coconut oil into a high speed blender or food processor.
  2. Blend for 30 seconds to a minute until well combined and a dough forms. If it's too thick, feel free to add a splash of milk to get it going.
  3. Place the dough in a bowl. If it's on the warm side, cover the bowl and place in the fridge for 10-15 minutes.
  4. Place the dark chocolate + 1 tbsp coconut oil into a glass bowl in the microwave and melt for 45 seconds to a minute + 30 seconds. Make sure to stop periodically to stir so it doesn't burn!
  5. Place parchment paper on a baking tray.
  6. Roll the dough into slightly smaller golf ball size balls + coat in melted chocolate and place on parchment paper. Place a sprinkle of lavender on each ball for decoration.
  7. Place in the fridge for 30 minutes to harden and enjoy!
  8. Lasts in the fridge for 2 weeks or freeze for 1 month (I promise they won't last that long though!)
  9. *Note: You can use 1 tbsp edible lavender flower in the dough instead if you can't find high grade lavender essential oil!


Hope you love these as much as my taste testers this past weekend 🙂

With Health + Happiness,

Jax

PS – For more truffles recipes, click here!

PPS – Don’t forget to sign up for the “12 Day Real Food Reboot” Program starting on April 22nd by clicking here! You won’t regret it 🙂

St. Patrick’s Day Truffles


Happy Friday! Since I’ve received rave reviews on my truffles, I decided to make it a tradition to come up with a new recipe every month. This month’s holiday is St. Patrick’s Day so obvs I had to use green ingredients to get you guys into the spirit! These tasty treats contain healthy fat, fiber, protein + antioxidants so you can always feel good about indulging in the “Little Adapts” truffles 🙂 They are an easy dessert to whip up, and are also dairy-free + gluten-free.

  • Healthy Fat: Avocado, Almonds
  • Fiber: Dates, Avocado, Almonds
  • Protein: Almonds, Avocado
  • Antioxidants: Matcha

If you want to be the hit of the party, trust me – bring these truffles! HAPPY ST. PATTY’S DAY, MY FRIENDS!!!


St. Patrick's Day Truffles
 
Prep time
Total time
 
Author:
Serves: 18
Ingredients
Instructions
  1. Place almonds, dates, almond milk, avocado, vanilla extract + matcha into a high speed blender or food processor.
  2. Pulse until ingredients are combined, but still have chunks and forms a dough. Scoop out dough into a medium sized bowl and place parchment paper onto a small baking tray.
  3. Melt dark chocolate + coconut oil in the microwave - making sure to stir every 30 seconds or so to make sure the chocolate doesn't burn.
  4. While the chocolate is melting, finely dice the pistachios.
  5. Roll the dough into golf size balls or smaller and place on parchment paper.
  6. Then using 2 forks, place each ball into the melted chocolate (allow the chocolate to drip off the ball before placing back onto the parchment paper.)
  7. Sprinkle each truffle with crushed pistachios.
  8. Place in the fridge for at least 30 minutes and enjoy! Keep in an airtight container in the fridge for up to 2 weeks.


With Health + Happiness,

Jax

PS – Trying to find your optimal health? Check out my latest blog post here.

Banana Breakfast Cookies

Since I’m always on the go between teaching, client calls, classes + health fairs, I really like to have healthy, low sugar snacks to eat before I teach/workout or bring with me on-the-go. I have learned that I prefer not to teach or workout on an empty stomach, but I also can’t eat a whole breakfast without feeling sick halfway through it. Typically, I’ve been making + grabbing for my Energy Nuggets or Beach Balls, but I was craving something new. With a few bananas getting a little too ripe, I decided to create these banana cookies. They are only sweetened with cinnamon + banana and taste amazing!!! For this recipe, I used sunflower butter, but you can substitute whatever nut butter you have on hand. These are super easy + convenient from an ingredient + time perspective so I hope you enjoy them 🙂


Vegan Banana Breakfast Cookies
 
Prep time
Cook time
Total time
 
Author:
Serves: 16
Ingredients
  • 1 ½ cups rolled oats
  • 3 medium bananas mashed
  • ½ cup sunflower butter or nut butter of your choice
  • 1 tsp cinnamon
  • 1 tsp vanilla extract
  • 4 tbsp hemp hearts (can sub ground flax or chia seeds)
  • 1 tsp baking powder
  • 1 flax egg (1 tbsp ground flax seed to 1.5 tbsp water)
  • ⅓ cup cacao nibs or vegan dark chocolate chips
Instructions
  1. Preheat the oven to 350 degrees F. Place the water + ground flax seed into a small bowl + whisk. Then let it sit for 5 minutes.
  2. In a large bowl, mash the bananas. Then add in oats, sunflower butter, cinnamon, vanilla extract, hemp hearts, baking powder, and flax egg until well combined.
  3. Fold in cacao nibs or vegan dark chocolate chips.
  4. Using a spoon or ice cream scooper, place batter onto baking tray.
  5. Bake for about 15 to 17 minutes until edges are browned.
  6. Cool on baking rack for 10 minutes + enjoy! Keep in the fridge for up to 2 weeks.


*Update: You can sub almond flour for oats + almond butter for sunflower butter and it’s just as good if not better!

With Health + Happiness Always,
Jax

PS – Check out my 6 + 12 week nutrition programs here!

Valentine’s Day Truffles

Did you love my pumpkin pie truffles from Thanksgiving?! If so, these Valentine’s Day Truffles are just as decadent and are the perfect Valentine’s Day dessert. The raspberries give the dough a pretty “pink” coloring and they’re packed with lots of healthy fat, fiber + protein and are only sweetened by dates. They’re also gluten-free, dairy-free, nut-free, refined sugar-free + grain-free so you can enjoy them and feel good too. Since I love making truffles + they’re so easy, I’m going to be creating “Little Adapts” truffles for every holiday this year. Stay tuned + don’t forget to tag me if you make them!

HAPPY VALENTINE’S DAY MY LOVES!!!


Valentine's Day Truffles
 
Prep time
Total time
 
Author:
Serves: 20
Ingredients
Instructions
  1. Place raspberries, dates, coconut milk, coconut butter, vanilla extract + coconut flour into a high speed blender or food processor.
  2. Blend for 30 seconds to a minute until well combined and a dough forms. If it's too thick, feel free to add a splash of milk to get it going.
  3. Place the dough in a bowl. If it's on the warm side, cover the bowl and place in the fridge for 10-15 minutes.
  4. Place the dark chocolate + coconut oil into a glass bowl in the microwave and melt for 45 seconds to a minute + 30 seconds. Make sure to stop periodically to stir so it doesn't burn!
  5. Place parchment paper on a baking tray.
  6. Roll the dough into slighly smaller golf ball size balls + coat in melted chocolate and place on parchment paper. Place 2 goji berries on each ball to resemble a "heart".
  7. Place in the fridge for 30 minutes to harden and enjoy!
  8. Lasts in the fridge for 2 weeks or freeze for 1 month (I promise they won't last that long though!)
  9. *Note: You can use any non-dairy milk on hand if you don't have coconut milk.


With Health + Happiness Always,
Jax

PS – Click here to access my other healthy eating dessert recipes!

PPS – Click here to learn more about my health coaching programs!

How To: Make Superfood + Green Packed Brownies

My favorite thing to do is “little adapts” food + recipes that I’ve always loved. These healthy recipes allow me to add extra nutrients, keep sugar low, and of course get creative in the kitchen. My latest obsession has been brownies. These babies are packed with superfoods + greens because I’m ALWAYS looking to add both to all of my meals whenever I can. Here are the two I used in this recipe:

  • Spinach – This green is packed with iron, folate, Vitamins A + C, and calcium. It also does not alter the taste of whatever you add it to so you won’t even know it’s in there!
  • Avocado – This superfood contains fiber, healthy fat, protein, potassium + Vitamin K. If you’re looking for a creamy texture, then avocado is a great addition. It also pairs well with cacao powder since it masks the avocado taste!

Now that you know all of the reasons why these healthy spinach + avocado brownies are so good for you, whip them up for your next party or for your kids!

With Health + Happiness Always,
Jax

PS – I’m experimenting more with nut-free flours + butters as I believe I may have a sensitivity to nuts so stay tuned for next month’s blog post after I get my blood results back!

PPS – For more healthy desserts, click here!

Superfood Brownies
 
Prep time
Cook time
Total time
 
Author:
Serves: 12
Ingredients
Instructions
  1. Preheat oven to 350 degrees F and line an 8x8 pan with parchment paper or coconut oil spray.
  2. Add spinach, water + avocado to a blender or food processor until well blended for 30 seconds or so.
  3. Add eggs, coconut oil, coconut sugar + vanilla extract to the blender or food processor and again blend for another 30 seconds (but make sure not to over blend!)
  4. In a bowl, combine coconut flour, cacao powder, and sea salt. Pour the wet mixture into the bowl and use a whisk to combine.
  5. Fold in the chocolate chips and pour into the pan.
  6. Sprinkle remaining chocolate chips on top and bake for about 25 to 30 minutes. Check with a tooth pick to see if it comes out clean, but bake less if you like it more fudgy.
  7. Enjoy eating your "cake" + having it too 🙂


Healthy Desserts: Holiday Edition

I have to admit that December is my favorite time of the year, but that’s because Christmas is my favorite holiday! I have always had a sweet tooth, but I just don’t enjoy the traditional holiday desserts anymore because they always leave me feeling bloated + guilty (unless of course they are worth it!) I’m pretty good at just having a few bites to satisfy my sweet tooth, but I much prefer “little adapting” my favorite recipes so I can actually enjoy my dessert + get some extra nutrients!

Two of these recipes include “peppermint” (which you can totally leave out if you love the OG recipe) because 1. When you think of December, you think of peppermint 2. Peppermint oil is such an amazing herb! Here is why:

  • Aids in digestion 
  • Relieves nausea
  • Freshens breath
  • Increases energy
  • Reduces fevers + cools the body
  • Alleviates sore muscles + joints
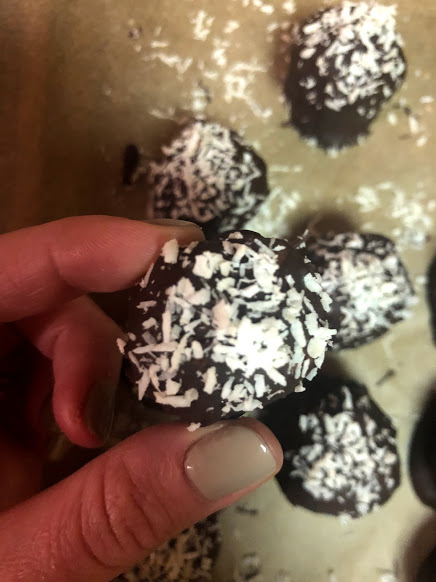
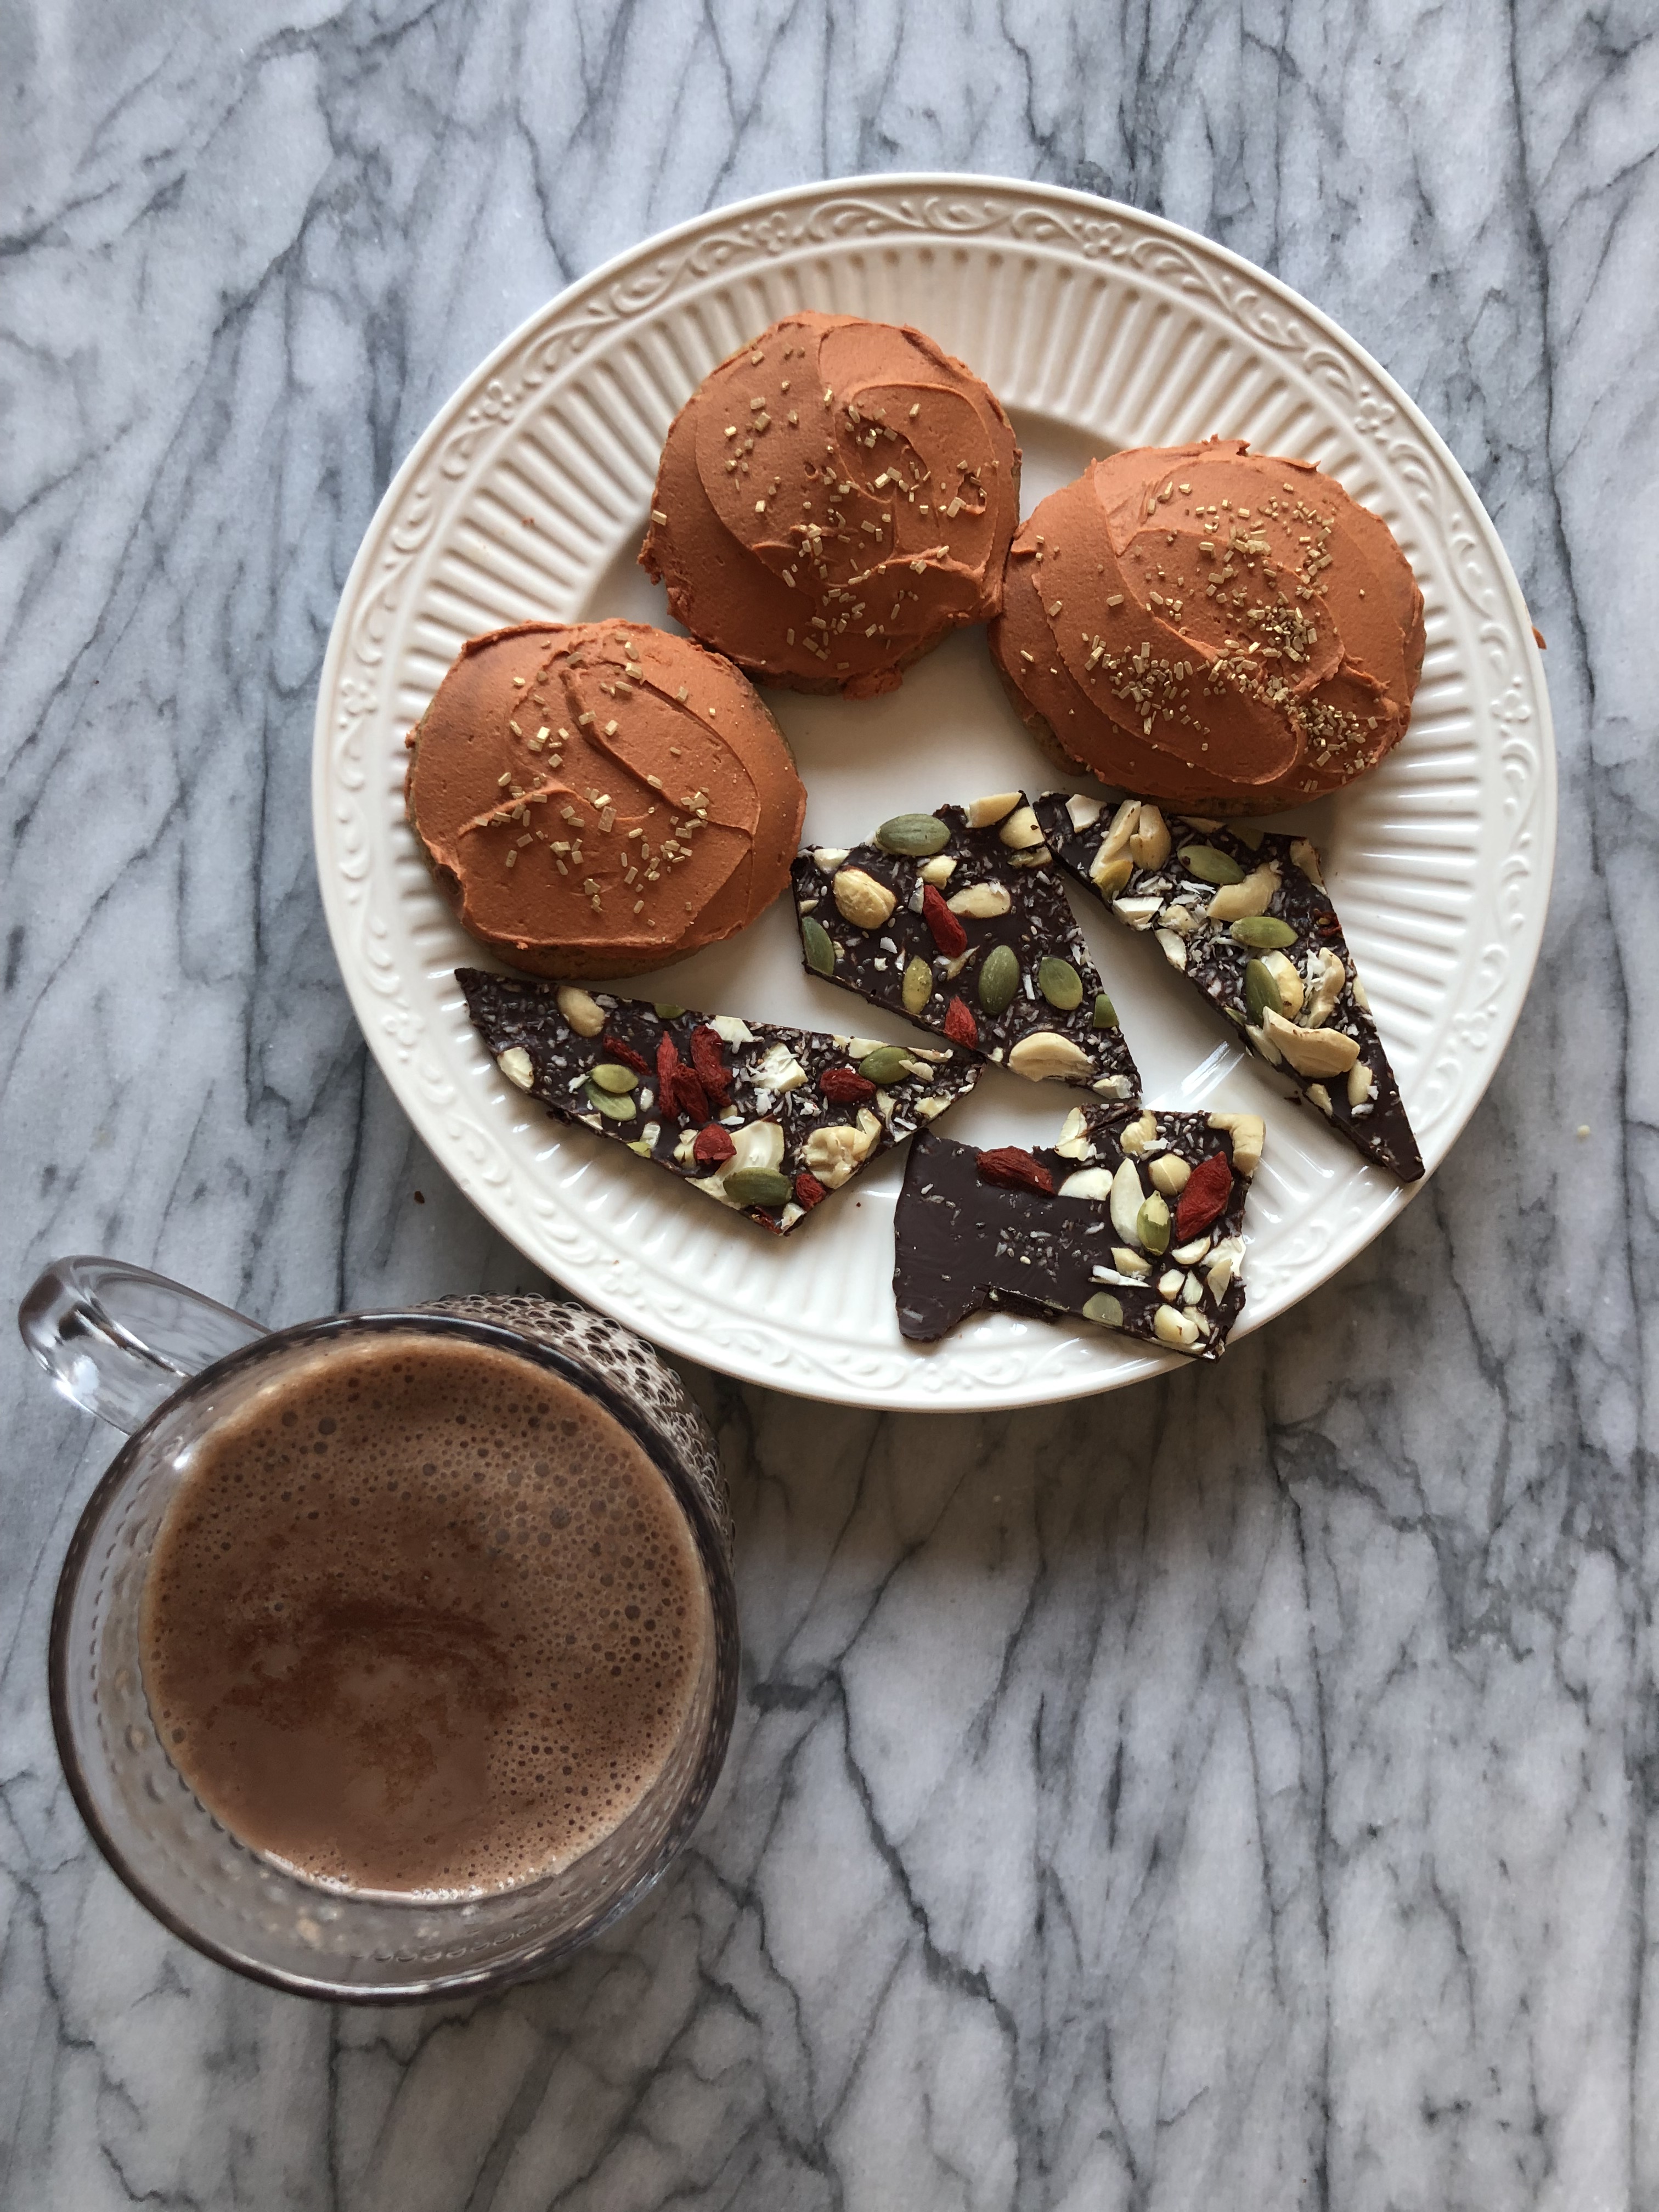
  1. This first holiday treat is a classic: PEPPERMINT HOLIDAY BARK. I traditionally bring this as a dessert or gift it to friends + family since it’s super thoughtful, yummy + easy to make. If you don’t know this about me by now, I’m a HUGE fan of dark chocolate. You can also use whatever toppings you love or readily have available in your pantry. This recipe is the perfect fit for the “Little Adapts” lifestyle – easy + convenient!
 
Peppermint Holiday Bark
 
Prep time
Cook time
Total time
 
Author:
Serves: 32
Ingredients
Instructions
  1. In a glass measuring cup or bowl, place dark chocolate, coconut oil + peppermint and heat for about 2 minutes. Checking every 40 seconds to mix the chocolate and make sure it doesn’t burn.
  2. While the chocolate is heating, place parchment paper over a large cookie tray and chop cashews.
  3. Pour chocolate mixture in the middle of the parchment paper in a rectangular shape.
  4. Use a spatula to spread out the mixture evenly, but make sure not to make it too thin or it will fall apart!
  5. Distribute nuts, seeds, berries + coconut (you can obviously substitute for whatever toppings you prefer in your bark!)
  6. Place into the fridge for about 15-20 minutes to harden.
  7. Take the chocolate out of the fridge and cut into bark like pieces.
  8. Store in the freezer, and enjoy!


2. The second holiday treat is another classic: PEPPERMINT HOT CHOCOLATE. As a kid, I’ve always loved hot chocolate. However, with a dairy allergy and decreasing my sugar intake these days, there aren’t many hot chocolate brands on the market that meet the “little adapts” standards. When this happens, I go into my kitchen + recreate it. This hot chocolate only takes about 10-15 minutes to make + I promise it will bring back all of your winter, childhood memories!


Peppermint Hot Chocolate
 
Cook time
Total time
 
Author:
Serves: 1
Ingredients
Instructions
  1. Pour dairy free milk into a small pot and start to heat on low.
  2. After a few minutes, add in unsweetened cacao powder + coconut sugar. Use a whisk to combine the ingredients as it continues to heat up until it is one consistent color and there is no clumps in the beverage. Feel free to taste test and add more cacao powder or coconut sugar if you want a more sweet, chocolate flavor.
  3. Finally, add in the peppermint and continue to whisk for another minute. Feel free to taste one last time to make sure it’s up to your liking. Enjoy!


3. My final holiday recipe is one that is near + dear to my heart: HOLIDAY BUTTER COOKIES. The original recipe was my Oma’s (great grandmother in German) that has been passed down from generation to generation and has been a staple in the holiday cookie category. I wanted to create a holiday treat that did not include chocolate because not everyone loves chocolate as much as I do (aka my husband, haha.) Obviously there is no butter, but the vegan butter does the trick (I used the brand “Miyokos”). This recipe is dairy-free + gluten-free and has a ton a flavor! You can choose to have them plain or decorate them with icing + sprinkles. (The icing was supposed to be red, but the natural dye I bought had other plans so don’t judge the rusty nail color!)

Dairy-free, Gluten-free Holiday Butter Cookies
 
Prep time
Cook time
Total time
 
Author:
Serves: 30
Ingredients
Instructions
  1. Preheat the oven to 375 degrees Fahrenheit.
  2. In large bowl, combine flours, xanthan gum, sea salt + baking powder. Set aside.
  3. In a mixer or using a hand mixer, combine butter + coconut sugar until light and fluffy.
  4. Then add in egg + vanilla extract. Once it is combined, gradually add in dry mixture until a dough forms.
  5. On ungreased cookie trays, roll dough into small balls and use finger or fork to flatten. You can also create shapes if you wish! Option to add just sprinkles at this time or leave them plain.
  6. Bake for about 6 to 8 minutes until edges of cookies are golden brown. Let them cool on wire rack.
  7. Once cooled (about 10 - 15 minutes), cover with icing + sprinkles and enjoy!
  8. Keep in an airtight container for up to 2 weeks.


Raw Pumpkin Pie Truffles

Do you love pumpkin pie + energy balls?! Look no further — these raw pumpkin pie truffles are the PERFECT healthy Thanksgiving dessert. I’ll be honest, these were a sheer kitchen accident. I meant to make pumpkin energy bites, but the dough ended up being too soft. The logical answer: coat them in dark chocolate + turn them into truffles (chocolate makes everything better, right?) They are the perfect mix of pumpkin + chocolate without being overly sweet + it seriously takes less than 30 minutes to make. What are you waiting for? If you make them for the holidays, please tag me as this makes me so happy 🙂


Raw Pumpkie Pie Truffles
 
Prep time
Cook time
Total time
 
Author:
Serves: 20
Ingredients
  • 1 cup raw almonds
  • 10 pitted medjool dates
  • 1 tbsp almond milk
  • 3 tbsp pumpkin puree
  • ½ tsp pumpkin pie spice
  • 1 bar organic dark chocolate bar
  • 1 tbsp coconut oil
  • Pumpkin seeds + sea salt for decoration
  • Parchment paper
Instructions
  1. Place almonds, dates, pumpkin puree, almond milk + pumpkin spice into a high power blender or food processor. Blend until a dough forms, but you still have some small pieces in it.
  2. Put dough in a bowl, cover + let it chill for 15 minutes.
  3. Right before you take the dough out to roll into balls, place the dark chocolate bar + coconut oil into glass/microwave safe bowl in the microwave for about 2 minutes (periodically stopping to stir).
  4. Place parchment paper on a baking tray and take dough out of the fridge. Start to roll the dough into small balls and dip balls in chocolate and place on parchment paper. After coating 6, stop to add 3 pumpkin seeds + a sprinkle of sea salt. Continue until all balls are coated + decorated!
  5. Place in the fridge to harden + keep in there for up to 2 weeks to enjoy!

With Health + Happiness,
Jax

For a free 15 minute health consultation, fill out this form: https://www.littleadaptsbyjax.com/contact/

Coconut Cashew Fat Bombs

These little fat bombs are best kept in the freezer and are the perfect mid-afternoon snack or post-meal sweet! Just made them last week, and I’m OBSESSED! Serving size is 1 to 2 balls, but I typically won’t have more than 2 in a day.

Coconut Cashew Fat Bombs
 
Prep time
Cook time
Total time
 
Author:
Serves: 15
Ingredients
Instructions
  1. Place pitted dates, nut milk, coconut oil, coconut butter + raw cashews into a high speed blender (Vitamix) or food processor.
  2. Start to blend on a low speed and gradually increase the speed as the ingredients start to combine. You may need to use the tamper to help blend the ingredients evenly. You want to create a dough like consistency that should only have tiny pieces in it.
  3. Using a spatula, scoop out the batter and place into a small/medium sized bowl. Cover with plastic wrap and put in the fridge for about 15 minutes to cool down. (If you don't, the chocolate chips will melt into the batter since it's so warm!)
  4. Take the batter out of the fridge and fold in mini vegan chocolate chips. Then pour the chia seeds onto a small plate.
  5. Roll batter into small balls (a little bit smaller than a golf ball) and then roll in chia seeds to fully coat. Place all balls into a container and store in the freezer for as long as you would like. Enjoy - most likely won't last more than 2 weeks!