Ever since doing dry January and two “12 Day Real Food Reboot” Programs, I have realized how caffeine affects my body. Before I dive into my findings, I want to make it known that I absolutely love the taste of coffee and have been drinking milk with a splash of coffee since I was little. I also LOVE coffee ice cream! When February 1st arrived, I couldn’t wait to have a cup of coffee because I missed the taste + experience of coffee. However, a few minutes after drinking the cup of coffee – I could feel the effects and felt a bit jittery. I started to do more research and realized that drip coffee actually contains much more caffeine than a shot of espresso or a cup of matcha.
Here is the break down:
- 12 oz cup of drip coffee = ~ 120 mg
- 2 oz of espresso = ~ 80 mg
- 1 tsp of ceremonial matcha = ~ 70 mg
As I gradually added coffee back here + there, I realized that I didn’t love the jittery feeling I got any longer. I started experimenting with non-dairy milk lattes + matcha/matcha lattes. It created a more sustainable energy level that didn’t allow me to crash in the afternoon. While I’ll still dabble with coffee, especially iced coffee in the summer, I’d much rather prefer matcha and will throw in lattes if “it’s worth it” because like I said, I still enjoy the taste of coffee.
Health Benefits
From a health perspective, matcha definitely has more health benefits. Matcha is essentially ground up green tea leaves, which provides you not only with caffeine but also with phyto-nutrients + antioxidants. The caffeine in matcha binds to our receptors in a different way than coffee, which allows for a slow release of caffeine in the bloodstream over time. As a result, it doesn’t affect your insulin or adrenalin levels, which is why you don’t “crash” after drinking it.
At the end of the day, we are all different + caffeine will affect everyone differently. Use this information as a way to learn more about your body and see how it is affected by certain foods. Regardless of what you choose to drink, please be aware that many coffee shops + cafes will add sweetener to their drinks or use sweetened non-dairy milks. For example, Starbucks’ matcha latte contains a TON of sugar. Ultimately, I started making my own matcha at home for two reasons:
- I can control what I’m putting into my matcha + add a little extra love in there.
- It’s much more cost effective!
Now let’s move on to what you need to make your own homemade matcha:
- Matcha – My favorite brand is Matchaful for a few reasons. It is female run, sustainable + of course organic. Need I say more? After trying lots of different matchas + then having this, my mind was blown on the quality + taste. If you are looking to enjoy just a regular matcha, then I recommend the Kiwami which is their highest quality matcha. If you are a lover of the matcha latte, then I recommend the Hikari matcha. Use the code “LITTLEADAPTS” for 15% off your next order 🙂 (PS – This article is in no way sponsored but an awesome collaboration!)
- Strainer – As I started to develop a taste for matcha, I realized that something was off when I made that home. Until I met with Sam from Matchaful, I had no idea the secret to amazing matcha was straining the matcha into the hot water in order to break it up. This is a MUST after having high quality matcha!

- Whisk Set – After you strain your 1 tsp of matcha into 2 oz of hot water (bring the water to a boil and then let it sit for a minute or two), you need to whisk it for 10 seconds or so to allow the matcha to blend with the hot water. This set comes with a matcha scooper + matcha stirrer and I find them very useful, but if you want to just get a matcha whisk – that’s totally fine. You also need to immediately clean them off in warm water and then let them air dry.

- Glass Measuring Cup – This is necessary to make it easier to pour the matcha + non-dairy milk into the matcha or matcha latte.
- Optional: Milk Frother – This is only needed if you like matcha lattes. Traditionally I used to throw the non-dairy milk into the Vitamix with all of my superfood additions, but using the frother + glass measuring cup is much more efficient in terms of blending + cleaning.
Now for the recipe…
How To: Make Your Homemade Matcha
- 1 oz Matchaful matcha (Use code "LITTLEADAPTS" for 15% off your order!)
- 2 oz filtered hot water to blend matcha
- 8 oz hot or cold filtered water to fill most of the cup
- Splash of non-dairy milk
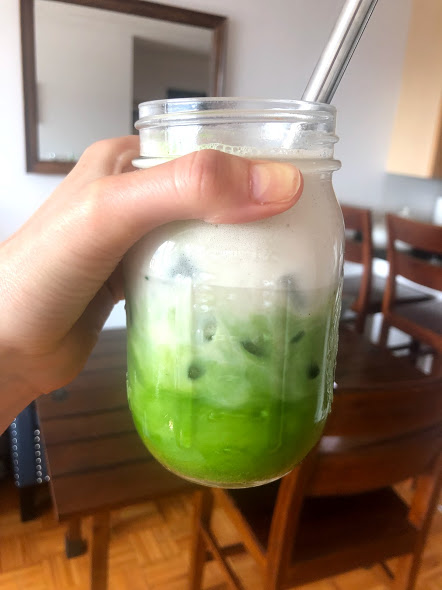
- Optional: Handful of ice for iced matcha
- 1 oz Matchaful matcha (Use code "LITTLEADAPTS" for 15% off your order!)
- 2 oz filtered hot water to blend matcha
- 8 oz non-dairy milk
- Splash of vanilla extract
- Sprinkle of cinnamon
- Optional: Handful of ice for iced matcha
- Boil water + let it sit for a few minutes.
- Pour water into glass measuring cup + place strainer on top of the glass cup.
- Pour scoop of matcha into strainer over glass and then use spoon to strain all of the matcha into the measuring cup.
- Use matcha whisk to whisk matcha + water for 10 seconds or so.
- Pour matcha into glass over ice for cold or after water/milk if hot.
- Pour in filtered water (hot or cold) and top off with splash of non-dairy milk.
- If having a matcha latte, pour non-dairy hot or cold milk into the glass measuring cup with vanilla + cinnamon + then froth for about 15 seconds or so until milk is frothy. Pour into mug first and then add in matcha if hot. Otherwise, pour cold mixture over ice + matcha mixture if cold. Enjoy!
3.5.3251
Hoping this article excites you about matcha as I truly love it and has become a staple in my morning routine! If you want to learn more about creating a morning routine, see my “12 Day Real Food Reboot” Program that launches again in September. Happy July friends!
With Health + Happiness Always,
Jax